Showing posts with label baby. Show all posts

Thursday, September 4, 2008

Easy Wall Art

We made some fantabulous canvas wall art that goes for big bucks at Pottery Barn and Pier 1, but was pretty cheap and VERY easy to make. If you want the project to be more involved, you can really go to town with different mediums and embellishments. We'll give instructions for the easy way, then extra tips for the more extravagant route. (For ideas on the more extravagant route, check out these ladies at http://winborgdesign.blogspot.com/)

You Will Need:
  • Stretched Canvas, any size or dimension (available at craft and art stores, we got ours on sale at JoAnne's for half price)
  • Mod Podge or other craft glue. This will be used to glue and seal our project so make sure that it is a glue that dries clear.
  • Sponge brush (also available in craft stores, but also at Walmart, usually 3 for $1)
  • Scrapbook papers
  • (Optional) Cheap acrylic paints that match your papers (you can get these at walmart for about $1 a piece, and you only need a few)
  • (Optional) Paint brush (something big and chunky will do the trick)
Creating the Art:
  • Decide what you want on your canvas. Emily got her inspiration from some Pottery Barn flower art. You could do animals, geometric shapes, something related to your child's hobby, anything! We saw a very cute one on 3 canvases that was a catarpillar with 2 big green paper circles of different patterns on each canvas, and little feet painted on. Get Creative!
  • Cut out your paper in the shape/size that you want (we made a template first so as not to make mistakes on our cute paper).
  • (Optional) Use paint in matching/accenting colors to add shadow, contrast or pizazz to your shape- especially if you will be layering multiple papers.
  • Let dry
  • Use your sponge brush to cover the back of your paper image with glue, making sure the entire shape is well covered.
  • Place in desired location on canvas and carefully smooth out any bubbles or bumps.
  • Once all pieces are in place, load sponge brush heavily with glue and begin brushing over the entire canvas. Go slowly over papered areas to prevent tearing or wrinkling. It is best to work brush strokes in one direction (up and down or side to side) for a more uniform look. Brush strokes will be visible once dry, but this is part of the "look."
  • Let dry, and hang!


Tips for Extravagance:
  • Add pictures to your art the same way you add paper. Black and white are particularly eye-catching in wall art
  • Scrapbook paper can be art in itself, create a collage of coordinating papers in different shapes and sizes, glue them on, seal with glue for a finished look and hang.
  • Distress: use sandpaper to rough up the edges of papers and pictures, Ink edges with black or brown stamp pads, water down white paint and fade a picture by brushing on a light whitewash, tear papers or even pictures (gasp!) to complete that vintage look.
  • Embellish: Stamp or write letters, slogans or phrases, add brads, eyelettes, decorated tags. You can also paint or ink large chipboard letters for a more stand-out look.
  • Glue on decorative jewels after the project has been sealed to really make your project pop!

Thursday, June 5, 2008

Easy Single Stitch Beanies

(For whatever size head you're looking to make)

This pattern is not a crochet how-to post, just a pattern for those who already know the basics of crochet. Really all you need to know for this is how to do a single stitch, and how to work in rounds. The 9 rounds given here should be big enough for the average toddler's head.

Time for a math refresher! This pattern is all about multiplication by 6's. Until reaching the point of the beanie size desired, you'll be counting/multiplying by 2's- 9's (give or take beanie size) and keeping multiplying until reaching #6. Then you are done with that round.

Round 1; 6 single stitches in 1st loop (6)

Round 2; 2 stitches in each single stitch (12)

Round 3; 2 stitches in 1st, 1 stitch in next; repeat (18)
(Stitch pattern= 2,1,2,1,2,1,2,1 etc..)

Round 4; 2 stitches in 1st, single stitch in next 2, repeat (24)
(SP= 2,1,1,2,1,1,2,1,1...)

Round 5; 2 stitches in 1st, single stitch in next 3, repeat (30)
(SP= 2,1,1,1,2,1,1,1,2.....)

Round 6; 2 stitches in 1st, single stitch in next 4, repeat (36)

Round 7; 2 stitches in 1st, single stitch in next 5, repeat (42)

Round 8; 2 stitches in 1st, single stitch in next 6, repeat (48)

Round 9; 2 stitches in 1st, single stitch in next 7, repeat (54)

  • When your beanie has a round "placemat" look and it's about the size of the crown of the head you are making it for. (It's the size of the crown when it looks like the small head covering Jewish men wear) Finish the Round you are on and then stop adding stitches and do only single stitches until the beanie is the length desired.
  • When finished, tie off the yarn and cut it a generous distance from the knot. Then use a yarn needle to thread the remainder up through the weave of the beanie.
  • The tightness of your yarn will play a huge roll in how many Rounds will be needed in your beanie. Example- tight stitches will equal more rounds.
  • The goal is to gradually "grow" the beanie so there won't be bumps or lumps.
  • For beanies to fit a larger sized head, continue adding a single stitch between the double stitches as you've done before. (example: Round 10; 2 stitches in 1st, single stitch in next 8, repeat (60) )

Wednesday, May 7, 2008

More Girlie Hair Clips

Since our girls seem to have a knack for losing their clips, we decided to extend our adventures in hair clips and try some new ideas, both for the clips themselves and their uses.

Bow Clips:

For these you will need some floral wire (or any very fine wire) and everything listed on the original girlie hairclips post.
  • Cover your clip with ribbon
  • For a traditional bow, fold your ribbon into a long rectangle, and pinch in the middle, forming little dimples on each side of your fingers.
  • For a layered bow (like the red one pictured at right), fold your ribbon into a rectangle, pinch in the middle, and
    continue folding back and forth across the center until you have the desired number of layers. (for patterned ribbon you will have to twist the ribbon at the center each time you fold to keep the pattern face-up)
  • Wrap pinched center with wire 2 or 3 times to hold shape
  • Cover wire with a short strip of ribbon hotglued at the back of the bow
  • Glue bow to clip

Other Tips and Ideas:
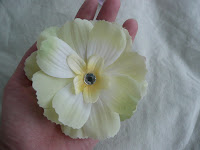
I made the large flower clip pictured at right entirely out of embellishments bought from the dollar store. Because it is spring, they had TONS of beautiful flowers for $1 a stem and about 8 flowers per stem. The jewel center was part of a cell-phone decorating kit I found (15 jewels per kit, also $1) and hot glued to my center. Beauty CAN be cheap!
On cold days, embellish a beanie with a big flower clip like the one pictured here. It can turn even the most boring beanie into a fashion statement! (These beanies are also very easy to make if you use the Knifty Knitter- you can easily make one for a little girl in about an hour)
For play-time, clip them into the waist of a dress-up tu-tu (tutorial on making the tu-tus coming soon...) as interchangeable accessories!
The possibilities are endless..... :)

Monday, May 5, 2008

Look, No hands!


Oh-so-fancy Baby Slings

What you will need:
  • Fabric: You will need a total of 3-4 yards of fabric- Either 3-4 yards of one fabric, or 1.5-2 yards each of two coordinating fabrics.
    Sizing: Kelli is an XXS and her sling is 21" x 52". This will take about 1.5 yards of each fabric. You can adjust the amount of fabric you will need depending on your bust, shoulder width, hips, and height.
    Choose a heavier-weight woven fabric (one that doesn't stretch)

    • Note: 3-4 yards of fabric will be enough to sew 2 complete slings -but you need to buy that much to get the length for two different prints.
  • Pattern
  • Sewing Machine
  • Thread
  • Cotton Piping: about 12 inches of 3/4 inch thick (this is about the thickness of a Crayola marker).
Pre-wash and dry fabric.

Making the Sling:
  • Fold fabric in half and place short end of pattern along fold. Pin pattern in place and cut fabric. (repeat for 2nd fabric if you have it)
  • Place cut fabric right sides together and stitch around all sides, leaving a small hole open for turning.
  • Turn and press.
  • Optional Step: When carrying a toddler in the sling, the fabric can hurt the back of their knees where they sit. We added piping to one side of the sling as padding for their knees. To add padding, insert piping into open hole used for turning. Center piping along one of the long sides of the fabric and pin in place. Stitch a casing around piping to hold it in place.
  • Close hole (tuck in edges of fabric and stitch through them as close to the edge as possible.)
  • Top stitch 1/4" from edge around all sides.
  • Fold fabric in half and line up curved edges. Pin along curved edge.
  • Stitch along curved edge, following top-stitch line already sewn.
  • Open up sling behind curved edge. Fold curved edge to the side so it lays flat with the rest of the fabric. Pin and stitch as close to the edge as possible. (this way your seam will lie flat with your fabric when you wear the sling, and adds strength to your seam.)
  • Load up your baby and go!

Extra Tips

  • Before you insert your piping, make sure and tape the ends to prevent fraying. Also, if you have to cut it, tape above where you will cut, and then cut. (It's easier!)
  • Our sling pattern is about a size small. If you need to make a sling for a taller/bustier mom, just make it longer (not wider). The width fits the baby, length fits you.

Friday, April 11, 2008

Pee Pee Tee Pees


I saw these at the Baby Expo the other day and just had to make some of my own just because they were so funny! Apparently the Tee-Pees serve as a little shield to keep you from getting sprayed when you change your baby boy's diaper. :)

You Will Need:


  • Fabric strips (I have seen flannel and terrycloth used) at least 7" wide and length depending on how many you plan on making.
  • Thread
  • Sewing Machine
  • Paper and scissors for making pattern
  • Cup or small bowl for making pattern (circle should probably be at least 4" across)

Making the Tee Pees

  • On my pattern, I have the diameter as 4 1/2" across, but another blogger found that a 6" diameter worked better, so you might want to find a cup or bowl about that diameter.
  • Use the cup or small bowl to draw a circle on your paper and cut it out.
  • Fold circle in half and then in half again to make an "x" marking the center of your circle
  • Draw a line from the center down the middle of one of the quarters of your circle.
  • Now cut out half the circle plus the little half-quarter piece, and this is your pattern.


  • Use your pattern to cut out two semi-circles.
  • Sew the two pieces right-sides together leaving one straight edge open for turning.


  • Turn right-side out, tuck in the open seam (so raw edges are inside) and press.


  • Sew the two straight edges together, and you're done!

Friday, January 25, 2008

Binkie Clips

You will Need:
  • 1 pkg 2" Badge ID Clips (available at Walmart or Office Supply stores- 12 for about $3)
  • Ribbon- 12 inches per clip you plan to make ( 3/8 width works best, but anything one inch and under will work.
  • Sewing Machine
  • Clear quilters thread- easy to find at any fabric store.
  • Terrifically Tacky Tape aka TTT (optional but very helpful!)
  • Fray Check (or other fray prevention product, also optional but helpful)

Making the Clips:


  • Remove the stud joining the two pieces of the badge clip together (we used craft pliers)
  • Cut your ribbon and treat ends with Fray Check
  • Open clip and thread ribbon down through hole at mouth of clip (inside to outside), then up through hole at back of clip, leaving approx 1" of ribbon protruding from back of clip.
  • Place a small piece of TTT behind second hole on bottom of clip. Fold protruding ribbon under clip and adhere end to TTT.
  • Fold ribbon at mouth of clip under bottom of clip. Stitch across width of ribbon at the back of the clip, securing folded ribbon end to main body of ribbon.
  • Take plastic piece and on the flat side, put a piece of TTT between the metal snaps. Adhere piece to ribbon leaving 3/4" of ribbon at end.
  • Put another piece of TTT on the outside end of the plastic piece. Fold ribbon end over twice (to hide rough end) and adhere to TTT on plastic piece.
  • Stitch across folded ribbon end, securing it to plastic piece
  • Stitch across inside end of plastic piece, securing it to main body of ribbon

Wednesday, November 7, 2007

Hooter Hiders


You Will Need:


  • 1 1/2 yards of fabric (if you want a different fabric on each side of your HH, then buy 3/4 yard of each fabric)
  • 2 D-rings for the strap (they should be at least 1" to 1 1/2" wide for a good, sturdy strap width)
  • Approx. 10 inches of boning for the stiff section between the straps that lets you keep an eye on your baby. (boning should span the space on your chest between your bra straps)
  • Thread to match your fabric(s)
  • An iron & ironing board

Making the Main Section:


  • Cut your fabric(s) into a 35"x25" rectangle. (Rectangle size can be adjusted for taller/shorter, larger/smaller mommies).
  • Place the right sides together and stitch all 4 sides together, leaving a 5 inch section open.
  • Through the opening, pull the fabric right sides out, and press.
  • Center the boning at the top of the fabric and mark where the casing will start and end.
  • Through the opening, insert boning and center between marks.
  • Stitch casing around boning.
  • Stitch opening shut.

Making the Strap:

  • For strap, cut a length of fabric approx 50" long, and between 3 to 4 inches wide (depending on the width of your rings).
  • Fold in half with wrong side of fabric out and stitch the long side and one short side together.
  • Turn inside out and press.
  • Cut a 4" length off one end (to hold the rings)
  • Trim long strap piece to desired length, and tuck and close any open ends on both strap pieces.

Putting it all together:

  • Insert short strap piece through both rings.
  • At one end of boning casing, fold 4" strap section over the top of the fabric so the ends are even on either side, and rings have plenty of room to move at top of fabric.
  • Making sure they are even, stitch strap ends to main body of fabric.
  • Pull one ring down to front of fabric so it rests on top of stitching just made, and stitch another line above it, creating a small casing (this will prevent the rings slipping through each other as you try to work the strap).
  • At the other end of boning casing, position one end of long strap piece even with the strap piece just finished and then stitch to fabric.
  • To complete the ensemble, weave loose end of long strap through both rings, and then back up through one and TA-DA! You're done!

Extra Tips:

  • It may be worth spending a little more money ($1 or $2) to buy a fabric that has been slightly coated to resist moisture and stains. I prefer a fabric that is just the tiniest bit stiff for better ventilation, but some women prefer softer, lighter fabrics.
  • The boning that seems to work best is RIGILENE. It goes for about $2.99/yd but you will need less than 1/3 yard for one HH so it works out to be a little less than a dollar.
  • Another boning tip. Hot gluing the ends of your boning and/or sewing the casing slightly longer than the boning will prevent the plastic strips inside the boning from poking through the fabric over time.
  • Large, plastic "o" rings are cheaper and just as cute to use for the strap. Plus, using these rings eliminates the need to sew a casing on the short strap to separate the rings.
  • To help your HH maintain its shape over time and washing, continue the bottom stitch line of your boning casing around the entire perimeter of the fabric, creating a sort of 1/2 inch "hem" (It's best to do this before sewing on any strap pieces!)

Tuesday, October 30, 2007

Girlie Hair Clips


You will need:


  • Salon Clips (Metal single prong clips)

  • 3/8" grosgrain ribbon (the more colors, the better!)

  • Terrifically Tacky Tape by Art Accentz

  • Hot Glue Gun

  • Silk Flowers (we recommend cheap roses or daises with petals removed completely from the stems and centers or packaged petals in the scrapbooking isles)

  • Decorative brads or buttons

  • Silk, Sheer, or Embroidered Ribbon for embellishment

Making the Clips:


  1. Cut your grosgrain ribbon into 4 1/2 inch strips (for covering clips)

  2. Cut Terrifically Tacky Tape using same measurements.

  3. Adhere tape to ribbon (keeping it centered) and remove red backing from tape.

  4. Place one end of ribbon inside clip near the spring and press sticky side to the inside of the top prong. Continue pressing ribbon along top of clip, inside back of clip and onto the bottom. (If all you want are cute, ribbon-covered clips, your work is done!)

  5. For flower clips, choose your petals (making sure all plastic spacers, centers and stems have been removed)

  6. Insert and open decorative brad, then glue to ribbon covered clip. I like to put a piece of Tacky Tape across the open brad prongs before gluing for extra stickiness.

Extra Tips:


  • You CAN skip the tacky tape and just use hot glue, but the tape does make the job quicker and cleaner.

  • For adding decorative ribbon behind flowers with brad centers, simply arrange your ribbon, use some sort of piercing tool to put a small hole through the center of your arrangement, then insert brad (with flower already in place) and open on other side of ribbon. You can then use small dabs of hot glue to keep ribbon in just the right place behind the petals.

  • Buttons make cute centers too, either hot glue them to flowers, and then glue the flowers to the clips, or use thread or floral wire to place them.

  • For non-slip clips, purchase non-slip drawer liners at the dollar store and hot glue one small strip to the inside of your top prong.