Showing posts with label christmas. Show all posts

Saturday, November 15, 2008

Decking the Halls Again!!!

Christmas Tree Skirt
Tuesday, December 18th at Gram's
12:00 noon

Print out this sheet to help you at the fabric store:

Thursday, March 6, 2008

Bag-A-Lopes


Next Project: Bag-A-Lopes
It's a gift bag made out of an envelope! These are inspired (aka copied) from my FAVORITE website: splitcoast stampers. Each week they have a new little tutorial that teaches you how to do something fun with stamps. This one is from a while ago. If you don't use stamps, you can modify just about any project on the webpage and just use printed paper or stickers or other embellishments.


This is what you need:
  • 9x12 White Catalog Envelope (I think the envelopes I found are larger, just get the largest you can find)
  • Paper Trimmer with Scoring Blade

  • Bone Folder (it's okay if you don't have one, or if you don't even know what this is-I never use one)

  • Extra-Strength Adhesive like Terrifically Tacky Tape (TTT)

  • Ribbon

  • Stamps & Embellishments to decorate

  • Corner Rounder optional
  • Optional:
    • Patterned Paper
    • Punches
    • Colored Card stock
Step by Step instructions:

  1. Step 1

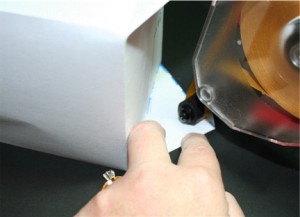
    Trim 3” from envelope off of the open end.

  2. Step 2

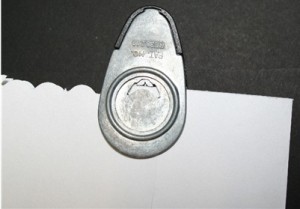
    Remove orange cutting blade from trimmer. With the opening of the envelope at the top, score in 2” from the right, left and bottom edges of the envelope.

  3. Step 3

    You will have a 2” square in each bottom corner, score from inside corner to the outer point.

  4. Step 4

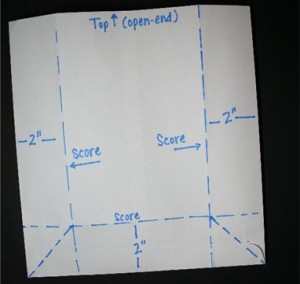
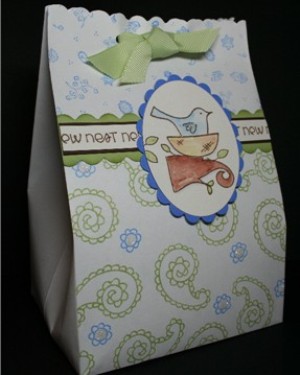
    This is the point at which you decorate the front of your gift bag, staying inside the score lines.

  5. Step 5 (Optional)

    If desired, use decorative scissor or corner rounder to scallop the top of your gift bag.

  6. Step 6

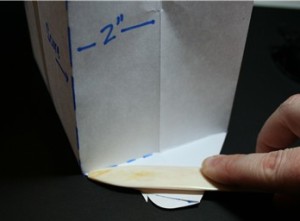
    Crease the score lines and pop the envelope into a bag, carefully bringing the bottom corner squares into a point on each side.

  7. Step 7

    Use bone folder to give points a crisp fold.

  8. Step 8

    Apply extra-strength adhesive to flaps that will fold in to the bottom of the bag.

  9. Step 9

    Fold flaps in to form bottom of the bag. Bottom will measure 5” x 4”.

  10. Step 10

    Punch holes through all layers of top edge for ribbon closure.

  11. Step 11

    Embellish the front of bag for gift giving.


Wednesday, November 21, 2007

Hung by the chimney with care.....


OK Divas, our next project is Christmas Stockings! I looked on Pottery Barn.com
and I found some super cute stockings that we can copy (don't worry, we can make four stockings for less than the price of one of theirs). I love the "Classic Ticking Stripe Stocking," so that's the one that I am going to do.

What you will need to make 4 identical stockings:
(approximate prices are included-everything purchased at Wal-Mart)
  • 1 yard ticking $4.40 (WalMart only has red stripes, JoAnns has more options but it's more expensive. Ticking is the best kind of fabric because it's kind of stiff.
  • 1/2 yard red velvet $2.50 (This will be MORE than enough, so if you want to use some of mine, feel free. It matches the red on the WalMart fabric, but you might want to get your own if you choose other fabric to make sure that they match).
  • 2 packs of Wrights brand Maxi Piping $2.80. The Scarlet color (#303076) matches well
  • Thread to match $1.50 (red or white whichever you like best. Coats & Clark is a great brand)
  • 1 yard really thin batting- Warm and Natural or Warm and White are a great thickness. $2.50.
  • 1 yard generic fabric for lining $2.00 or more (use white, red, or more ticking if you want)
  • 1 package white or cream DMC embroidery floss (the stuff you would use to cross-stitch) $.35
Other Option: Channel-Quilted Stocking

There is a kind of fabric you can buy that is already quilted in straight lines and it already has batting in it. I don't know the price or what color choices you would have, but buying this kind of fabric could simplify the project a bit. If you do get quilted fabric, don't buy lining fabric, or batting. This might end up saving you a little money.

Pattern and Stocking Size:
The pattern and instructions I found were at About.com.
You can make the stocking whatever size you want by copying the pattern into a Word processing document and adjusting all three pieces until you get the right size.
The stocking we will be making is about 15 inches tall and about 9 inches wide(at the widest spot). I will provide patterns that are this size.

Cutting Your Fabric/ Getting Ready
  • Fold ticking in half, wrong side together. Pin pattern in place (making sure it is in line with the stripes on the fabric) and cut through both layers. Repeat 3 more times.
  • Repeat process for lining, batting, and stocking cuff.
  • Using the velvet, cut 4 rectangles approx 1 1/2 to 2 inches wide and 4 inches long to use for the strap to hang stockings by.

Sewing the Stocking

  • Stitch lining pieces together following shape of stocking and set aside
  • Match up one piece of ticking with one piece of batting (ticking right side up)
  • Pin piping through both pieces along contour of stocking. Make sure the loose ends of the piping face out towards the edges of the stocking, with "pipe" on the inside (see photo)
  • Using a zipper foot on your machine, stitch through piping, ticking and batting, following and stitching over the stitch visible on the piping.
  • Place 2nd piece of ticking face down on top of the stitched piece, follow with 2nd piece of batting, and pin all pieces together (see photo)
  • Turn pinned stocking over (you should see your first stitch on the bottom piece of batting) and stitch over your first stitch, following it exactly.
  • Turn right side out

Making and attaching the cuff and loop

  • If you will be hand-stitching names on your cuff, now is the time to pencil on your lettering using a light table or window to trace the name onto one piece of velvet cuff.
  • Sew a small hem along the bottom of both pieces of cuff. (make SURE it is the bottom!)
  • Securely pin both pieces, right sides and hems together, and stitch together on both sides that touch the hemmed side.
  • Pull cuff over stocking (hem down) until top of cuff matches up with top of stocking and pin.
  • For the loop, take one velvet rectangle, fold in half long ways with right sides together and stitch along long end. Turn inside out
  • Fold sewn rectangle in half and pin to cuff and stocking where you would like it to be attached.
  • Stitch cuff and loop to stocking along the top. If desired, use a long basting stitch.

Attaching the Lining

  • Leave lining wrong side out and pull over stocking, cuff and loop. Pin along the top.
  • Stitch lining to stocking along top (similar to when attaching cuff and loop)
  • Pick open stitching on lining along flat foot section, and pull stocking through opening.
  • Now that the lining is right side out, stitch opening in lining foot closed, and insert into stocking.
  • To finish, stitch a line around the top of the stocking about 1/2 inch from the top to secure lining and keep cuff from rolling down into the stocking. Hand stitch name onto stocking cuff if desired and you're done!