Wednesday, May 7, 2008

More Girlie Hair Clips

Since our girls seem to have a knack for losing their clips, we decided to extend our adventures in hair clips and try some new ideas, both for the clips themselves and their uses.

Bow Clips:

For these you will need some floral wire (or any very fine wire) and everything listed on the original girlie hairclips post.
  • Cover your clip with ribbon
  • For a traditional bow, fold your ribbon into a long rectangle, and pinch in the middle, forming little dimples on each side of your fingers.
  • For a layered bow (like the red one pictured at right), fold your ribbon into a rectangle, pinch in the middle, and
    continue folding back and forth across the center until you have the desired number of layers. (for patterned ribbon you will have to twist the ribbon at the center each time you fold to keep the pattern face-up)
  • Wrap pinched center with wire 2 or 3 times to hold shape
  • Cover wire with a short strip of ribbon hotglued at the back of the bow
  • Glue bow to clip

Other Tips and Ideas:
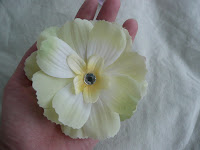
I made the large flower clip pictured at right entirely out of embellishments bought from the dollar store. Because it is spring, they had TONS of beautiful flowers for $1 a stem and about 8 flowers per stem. The jewel center was part of a cell-phone decorating kit I found (15 jewels per kit, also $1) and hot glued to my center. Beauty CAN be cheap!
On cold days, embellish a beanie with a big flower clip like the one pictured here. It can turn even the most boring beanie into a fashion statement! (These beanies are also very easy to make if you use the Knifty Knitter- you can easily make one for a little girl in about an hour)
For play-time, clip them into the waist of a dress-up tu-tu (tutorial on making the tu-tus coming soon...) as interchangeable accessories!
The possibilities are endless..... :)
Monday, May 5, 2008

Look, No hands!


Oh-so-fancy Baby Slings

What you will need:
  • Fabric: You will need a total of 3-4 yards of fabric- Either 3-4 yards of one fabric, or 1.5-2 yards each of two coordinating fabrics.
    Sizing: Kelli is an XXS and her sling is 21" x 52". This will take about 1.5 yards of each fabric. You can adjust the amount of fabric you will need depending on your bust, shoulder width, hips, and height.
    Choose a heavier-weight woven fabric (one that doesn't stretch)

    • Note: 3-4 yards of fabric will be enough to sew 2 complete slings -but you need to buy that much to get the length for two different prints.
  • Pattern
  • Sewing Machine
  • Thread
  • Cotton Piping: about 12 inches of 3/4 inch thick (this is about the thickness of a Crayola marker).
Pre-wash and dry fabric.

Making the Sling:
  • Fold fabric in half and place short end of pattern along fold. Pin pattern in place and cut fabric. (repeat for 2nd fabric if you have it)
  • Place cut fabric right sides together and stitch around all sides, leaving a small hole open for turning.
  • Turn and press.
  • Optional Step: When carrying a toddler in the sling, the fabric can hurt the back of their knees where they sit. We added piping to one side of the sling as padding for their knees. To add padding, insert piping into open hole used for turning. Center piping along one of the long sides of the fabric and pin in place. Stitch a casing around piping to hold it in place.
  • Close hole (tuck in edges of fabric and stitch through them as close to the edge as possible.)
  • Top stitch 1/4" from edge around all sides.
  • Fold fabric in half and line up curved edges. Pin along curved edge.
  • Stitch along curved edge, following top-stitch line already sewn.
  • Open up sling behind curved edge. Fold curved edge to the side so it lays flat with the rest of the fabric. Pin and stitch as close to the edge as possible. (this way your seam will lie flat with your fabric when you wear the sling, and adds strength to your seam.)
  • Load up your baby and go!

Extra Tips

  • Before you insert your piping, make sure and tape the ends to prevent fraying. Also, if you have to cut it, tape above where you will cut, and then cut. (It's easier!)
  • Our sling pattern is about a size small. If you need to make a sling for a taller/bustier mom, just make it longer (not wider). The width fits the baby, length fits you.