Bow Clips:
For these you will need some floral wire (or any very fine wire) and everything listed on the original girlie hairclips post.
- Cover your clip with ribbon
- For a traditional bow, fold your ribbon into a long rectangle, and pinch in the middle, forming little dimples on each side of your fingers.
- For a layered bow (like the red one pictured at right), fold your ribbon into a rectangle, pinch in the middle, and
continue folding back and forth across the center until you have the desired number of layers. (for patterned ribbon you will have to twist the ribbon at the center each time you fold to keep the pattern face-up) - Wrap pinched center with wire 2 or 3 times to hold shape
- Cover wire with a short strip of ribbon hotglued at the back of the bow
- Glue bow to clip
Other Tips and Ideas:
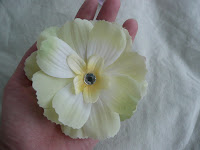
I made the large flower clip pictured at right entirely out of embellishments bought from the dollar store. Because it is spring, they had TONS of beautiful flowers for $1 a stem and about 8 flowers per stem. The jewel center was part of a cell-phone decorating kit I found (15 jewels per kit, also $1) and hot glued to my center. Beauty CAN be cheap!
On cold days, embellish a beanie with a big flower clip like the one pictured here. It can turn even the most boring beanie into a fashion statement! (These beanies are also very easy to make if you use the Knifty Knitter- you can easily make one for a little girl in about an hour)
For play-time, clip them into the waist of a dress-up tu-tu (tutorial on making the tu-tus coming soon...) as interchangeable accessories!
The possibilities are endless..... :)


No comments:
Post a Comment